


Underpainting makeup may be gaining traction on TikTok, but if you ask Milk Makeup Director of Artistry Sara Wren, it’s “the only way I’m going to do my makeup from now on.” Clearly, this is your sign to hop on the bandwagon for this viral makeup technique.
For those unfamiliar, underpainting involves putting on your bronzer, highlighter, contour, blush, and concealer before applying foundation. By flipping the order of your steps and placing color and warmth below your base, your makeup will have a more subtle, natural-looking effect. It’s a seamless way to get that lit-from-within effect—because everything literally peeks through your foundation instead of sitting on top of it. It's also a great way to apply our Cooling Water Jelly Tint in pHreeze—which is pH-activated, and reacts to your natural skin tone throughout the day.
If you’re a newbie to this trend, we put together a beginner-friendly, step-by-step makeup tutorial so you can nail it like a pro at home.

What you'll need:
How to Underpaint
For underpainting, you’ll need all the same makeup products you typically use on your face. However, if you need specifics, Sara recommends Matte Bronzer, Future Fluid All Over Cream Concealer, and Bionic Blush or our new pH-activated Cooling Water Jelly Tint in pHreeze to start.
1. BronzeAfter your usual skin prep, apply your bronzer to a clean and moisturized face on all the usual areas—tops of the cheeks, across the bridge of the nose, and around the hairline. Then, blend out any harsh lines with a fluffy brush. You can stop there, or if you want added depth, contour your face while you’re at it with Sculpt Stick, our viral cream contour stick. |
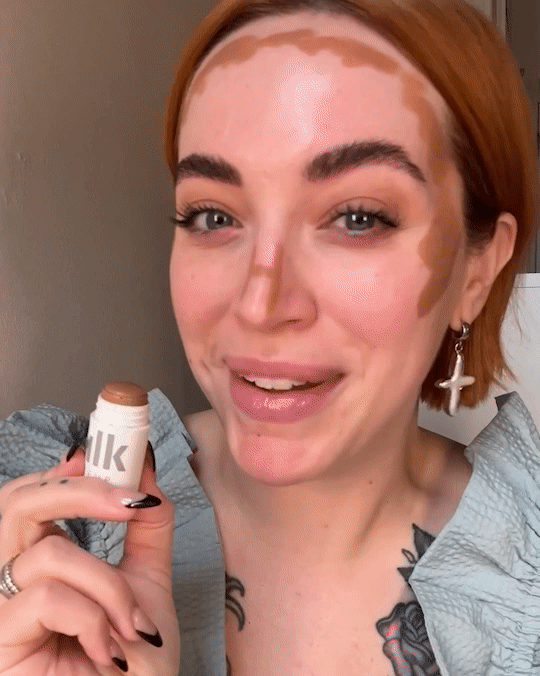 |
2. ConcealReach for your Future Fluid and conceal your under-eyes. Then, dab it anywhere else that needs extra coverage. |
 |
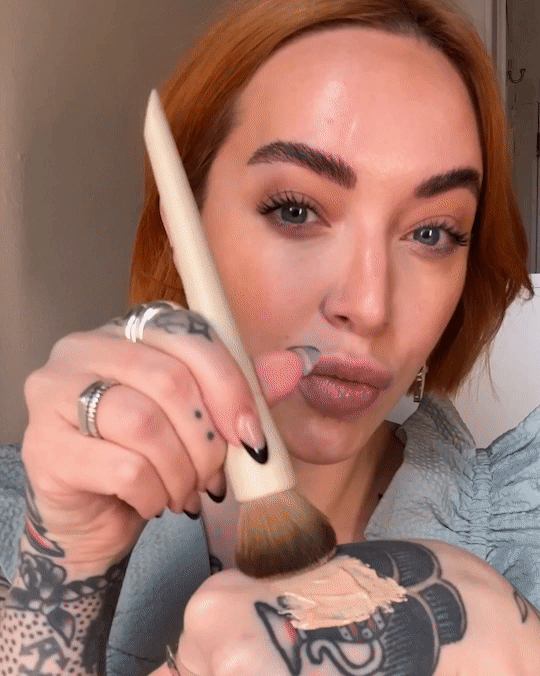
3. FoundationLeaving your foundation for last allows your makeup to “marinate and marry everything together for a flawless finish,” Sara explains. She likes to add her favorite formula to the back of her hand before dipping a fluffy foundation brush into it and tapping it onto her skin. Start at the center of your face and work outward. Be sure not to drag your brush—just stamp, pat, and tap to keep the groundwork you laid down in all the right places. |
 |
4. BlushDepending on which makeup artist you ask, blush can come before or after foundation when underpainting makeup. Sara likes to do it after to keep her blush as vibrant and dewy as possible. However, feel free to try it out before to see how the color softly glows through your foundation. Here, Sara uses our liquid blush, Bionic Blush, in Teleport. Our Cooling Water Jelly Tint in pHreeze is also perfect for underpainting, according to Mimi Sanchez, Milk Makeup’s Northeast Regional Sales & Education Manager. Since its pink shade (which looks unique on everyone’s skin tone, by the way) is slightly more pigmented than our other liquid and cream blushes, she recommends applying it before your foundation. “Apply Cooling Water pH Jelly Tint onto cheeks, then apply Hydro Grip Gel Tint to the areas that need coverage and over Cooling Water pH Jelly Tint,” she says. Whether you add the blush before or after your foundation, you’ll still get that defined, warm, sculpted natural makeup look with just the right amount of a glow. |
 |
Et voilà, the underpainting makeup technique. Give it a try yourself—we bet you’ll never do your makeup any other way again.
Meet the Expert
Sara Wren (she/her) is the Director of Artistry at Milk Makeup. In her role, she does all the makeup artistry and direction for our Milk Makeup global campaigns, educates the staff and field team on application methods, stars in the brand’s social media videos, and travels to different markets spreading Milk Makeup’s good vibes. When she’s not on set, Sara loves experimenting with DIY hair colors, eating tacos, watching basketball, and scouring for vintage cosmetics to add to her impressive collection.
Meet the Authors

Devon Abelman
Devon Abelman (she/her) is a Brooklyn-based freelance writer who focuses on the intersections and intricacies of beauty, culture, astrology, and mental health. She is passionate about shining light on under-the-radar BIPOC and LGBTQIA+ beauty creators as well as Korea’s impact on global beauty trends. In her spare time, Devon can be found dressing up Scorpion, her XXXL blind-and-deaf rescue dog.

Jennifer Hussein
Jennifer Hussein (she/her) is the Copywriter for Milk Makeup and a New York City-based freelance beauty, fashion, and culture writer. Her work has been featured in Cosmopolitan, Teen Vogue, Byrdie, Allure, and more.


